SecTeer VulnDetect & PatchPro Support Forum VulnDetect
    • Categories
    • Recent
    • Tags
    • Popular
    • Users
    • Search
    • Download VulnDetect Installer
    • Login
    1. Home
    2. rnz
    3. Posts
    Offline
    • Profile
    • Following 0
    • Followers 0
    • Topics 16
    • Posts 16
    • Groups 0

    Posts

    Recent Best Controversial
    • VLC MSI not updating and how to "switch" installers

      Hi,

      If you're experiencing issues with VLC not updating, this may be because the vendor stopped creating MSI installers as of version (3.21). We rely on official vendor installers and will update our package as soon as the MSI becomes available.

      You can follow the official discussion thread here for more details:
      https://forum.videolan.org/viewtopic.php?f=14&t=164735&p=544928&hilit=msi#p544928

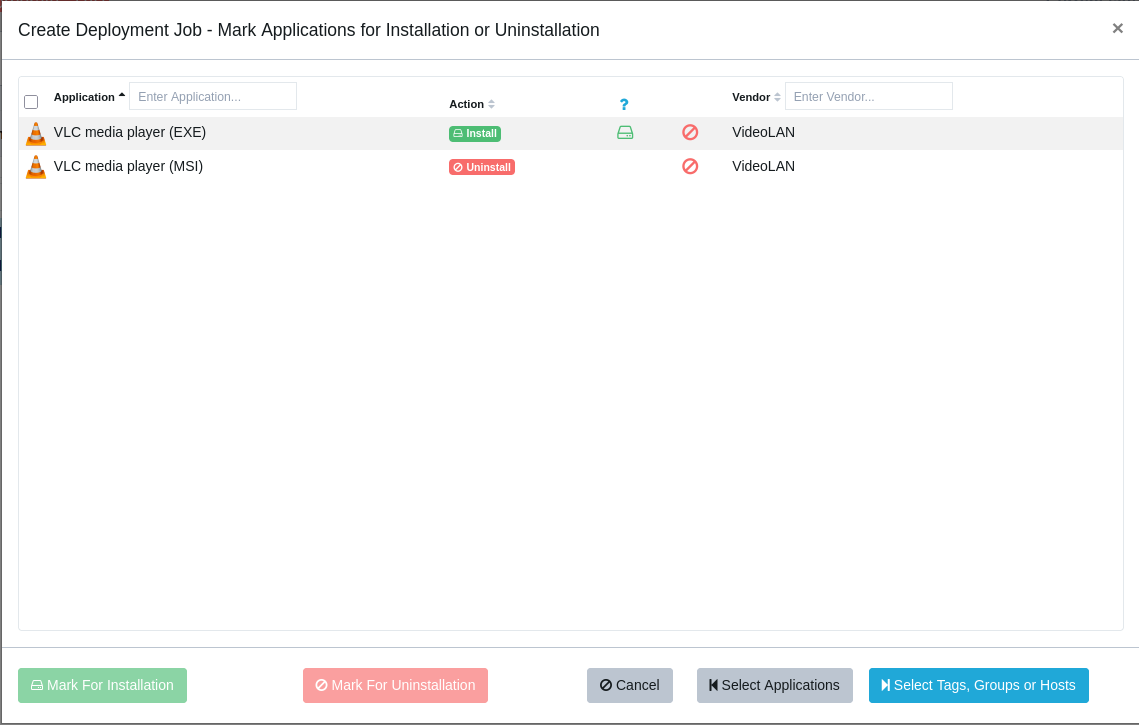
      To help differentiate between installer types, we've updated VLC's title to clearly indicate whether it's an MSI or EXE installer:

      VLC media player (EXE)
      VLC media player (MSI)
      

      To switch your MSI installation to the EXE version, use the Software Deployment feature to create a combined job that removes the MSI and deploys the EXE version simultaneously:
      f6d2a9bf-dc77-408b-9b61-af4afffca498-image.png

      posted in [Corporate] Deployment -> Custom Software
      rnzR
      rnz
    • QGIS - Upgrade

      When deploying the latest installer, QGIS does not replace the previous version. Instead, it installs alongside the existing version, resulting in a side-by-side installation.

      In order to accommodate this caveat, we have the following workaround:

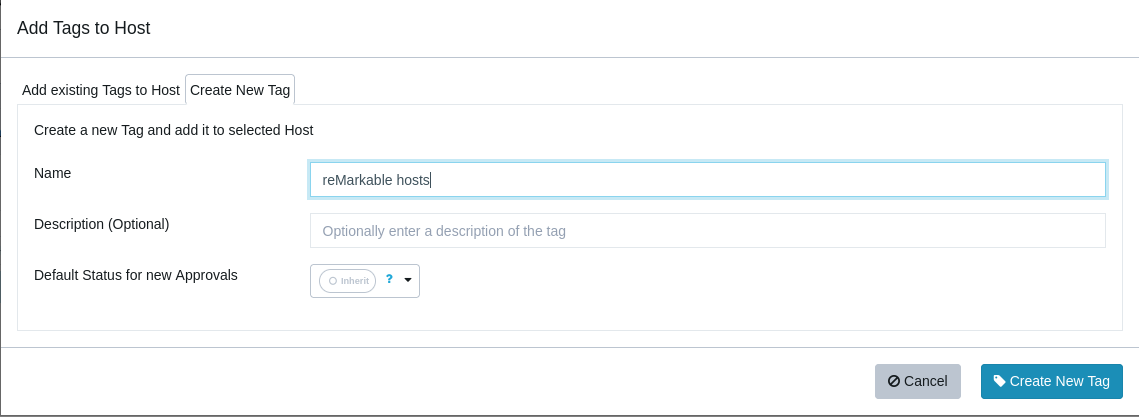
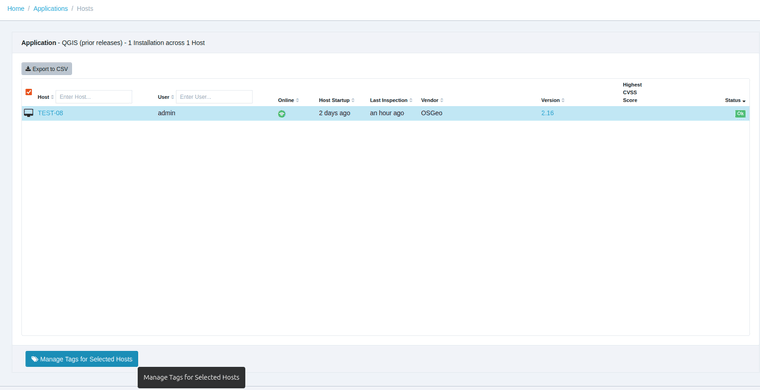
      1. Create a tag for all hosts with QGIS installed

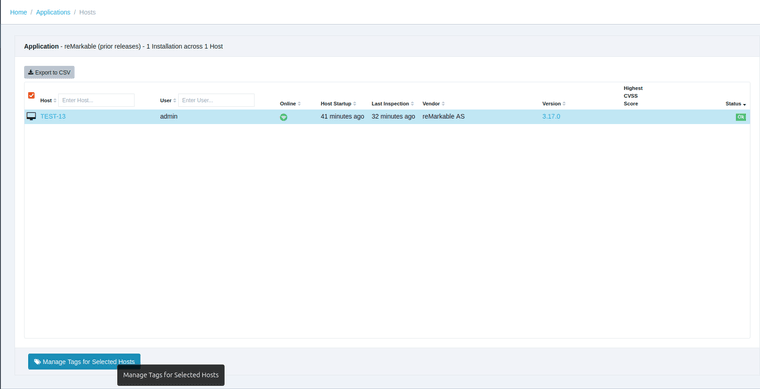
      From the Applications page, click on the result under the Installations column to view hosts with QGIS (prior releases) installed and use the Manage Tags for Selected Hosts button to create the new tag.

      e0af66d8-d249-474d-b707-c6142a11be31-image.png
      0dd7b86a-7e83-4316-a9e7-1c00f4939047-image.png

      2. Uninstall Prior Versions

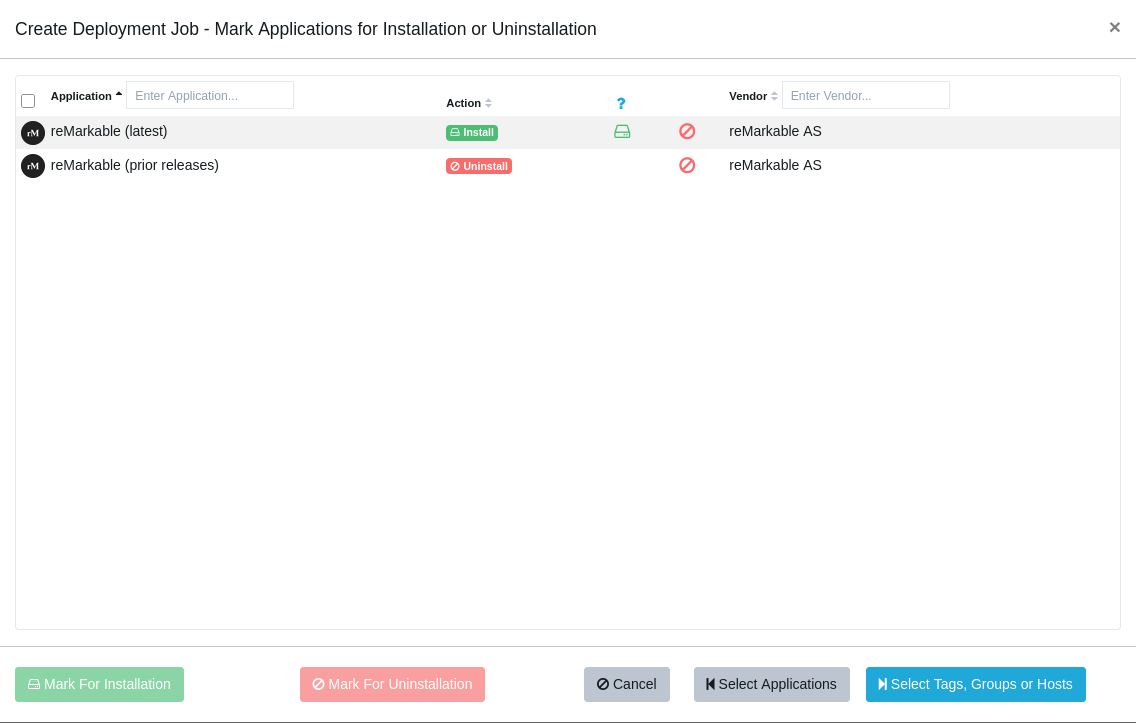
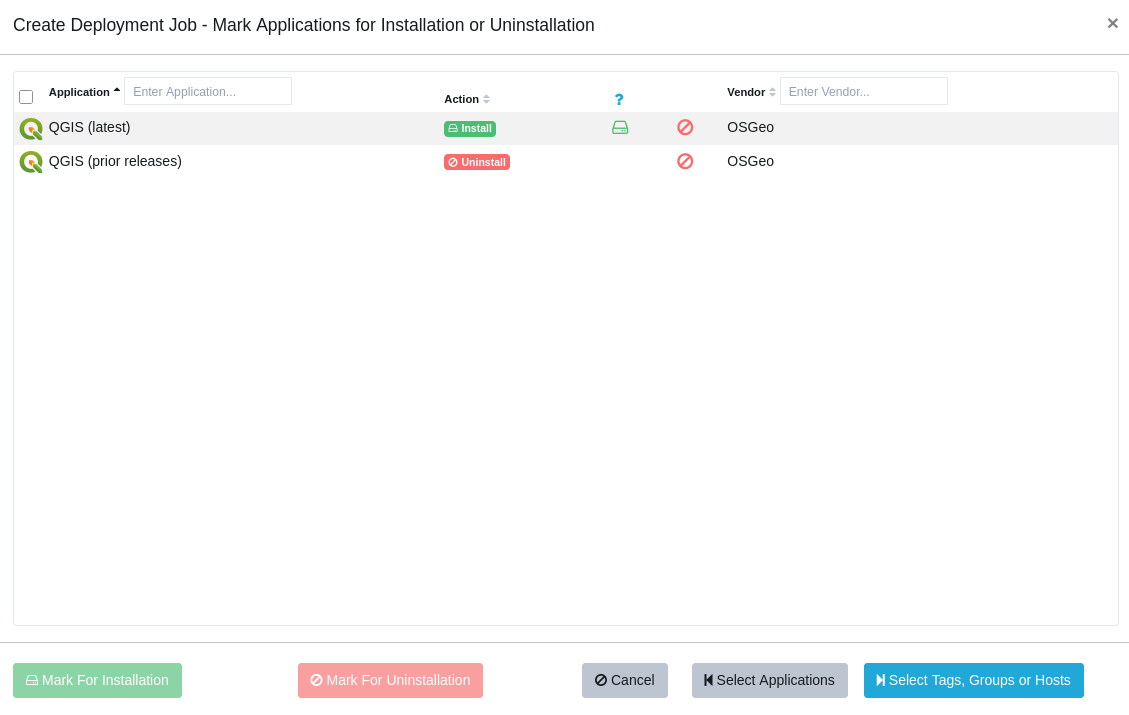
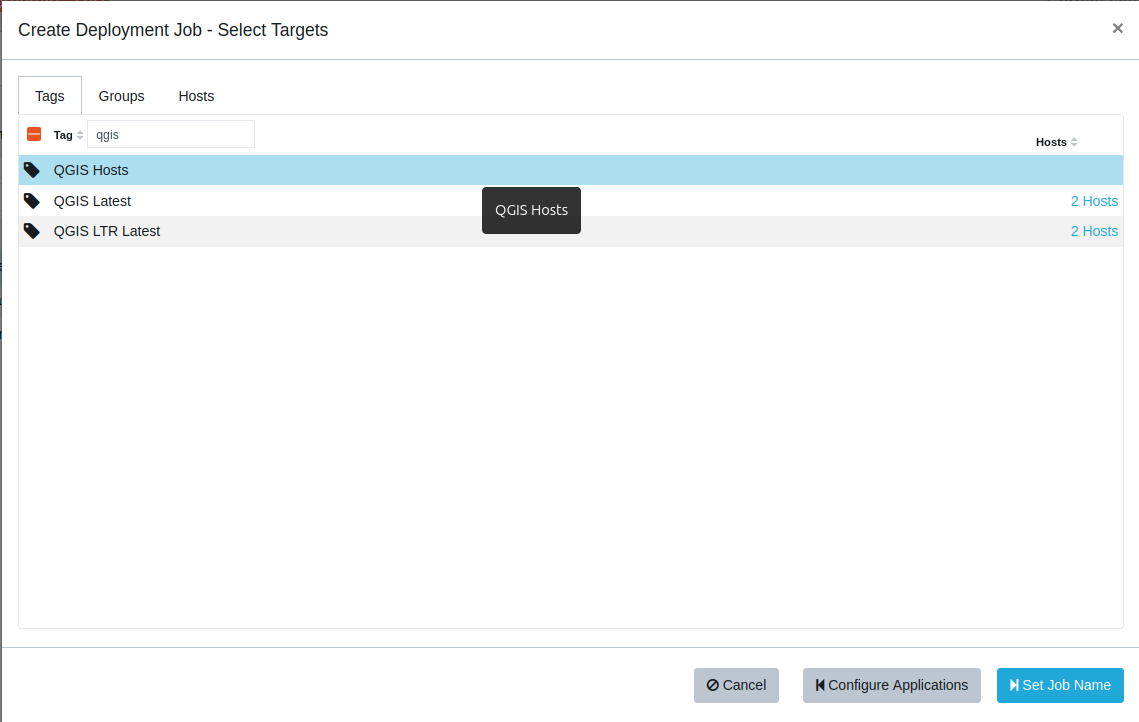
      Using the Software Deployment feature, apply the QGIS (prior releases) uninstall and QGIS (latest) deployment jobs to the tagged hosts.

      f062d5ac-3d5a-45c8-8a99-848c2bb70163-image.png
      Additional inspections might be required for the job to fully complete.
      0f922b02-9a1e-4435-aebe-e80b2ab2d93e-image.png

      Note:

      Alternatively, using two separate jobs (one for uninstall and one for installation) is also possible, though keep in mind that the uninstall job would then run only once and need reactivation if required again. Therefore, we suggest using a combined job to remove and deploy QGIS versions simultaneously, as this is the smart, automated approach.

      posted in [Corporate] Deployment -> Custom Software
      rnzR
      rnz
    • R for Windows - Upgrade

      When deploying the latest installer, R for Windows does not replace the previous version. Instead, it installs alongside the existing version, resulting in a side-by-side installation.

      In order to accommodate this caveat, we have the following workaround:

      1. Create a tag for all hosts with R for Windows installed

      From the Applications page, click on the result under the Installations column to view hosts with R for Windows installed

      0750c7b9-8f22-433f-93e4-ba18690f702a-image.png

      Use the Manage Tags for Selected Hosts button to create the new tag.

      2. Uninstall Prior Versions

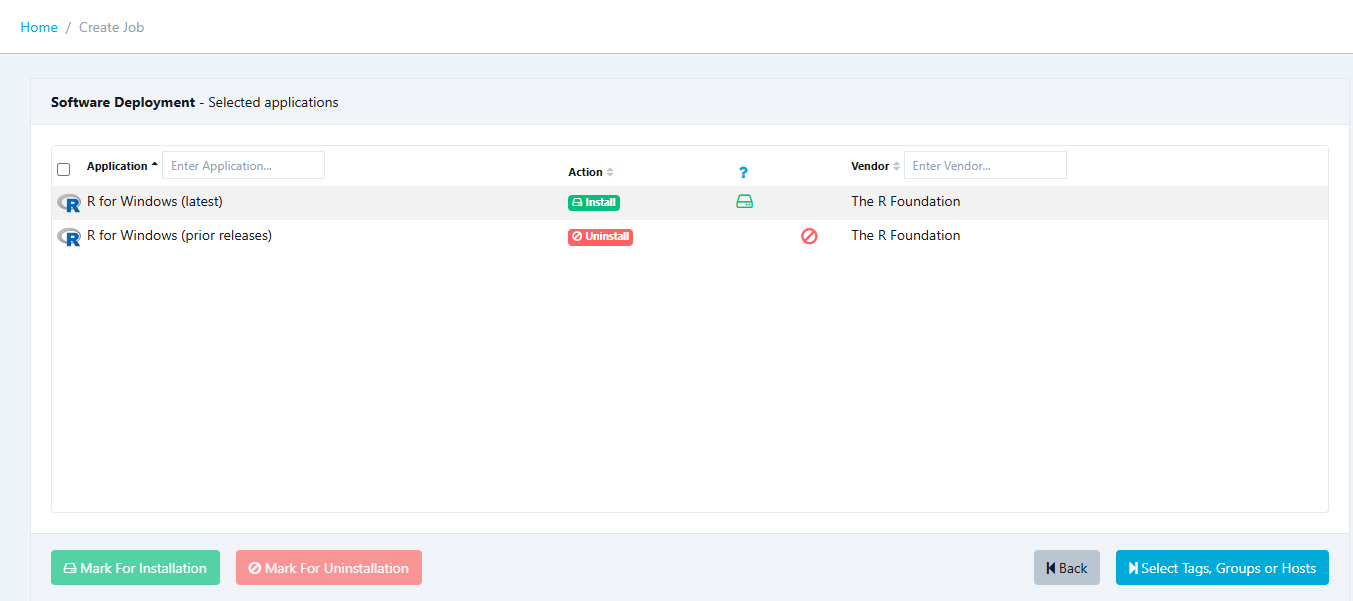
      Using the Software Deployment feature, create a job that applies the R for Windows (prior releases) uninstall job and deploys the R for Windows (latest) job to the tagged hosts.
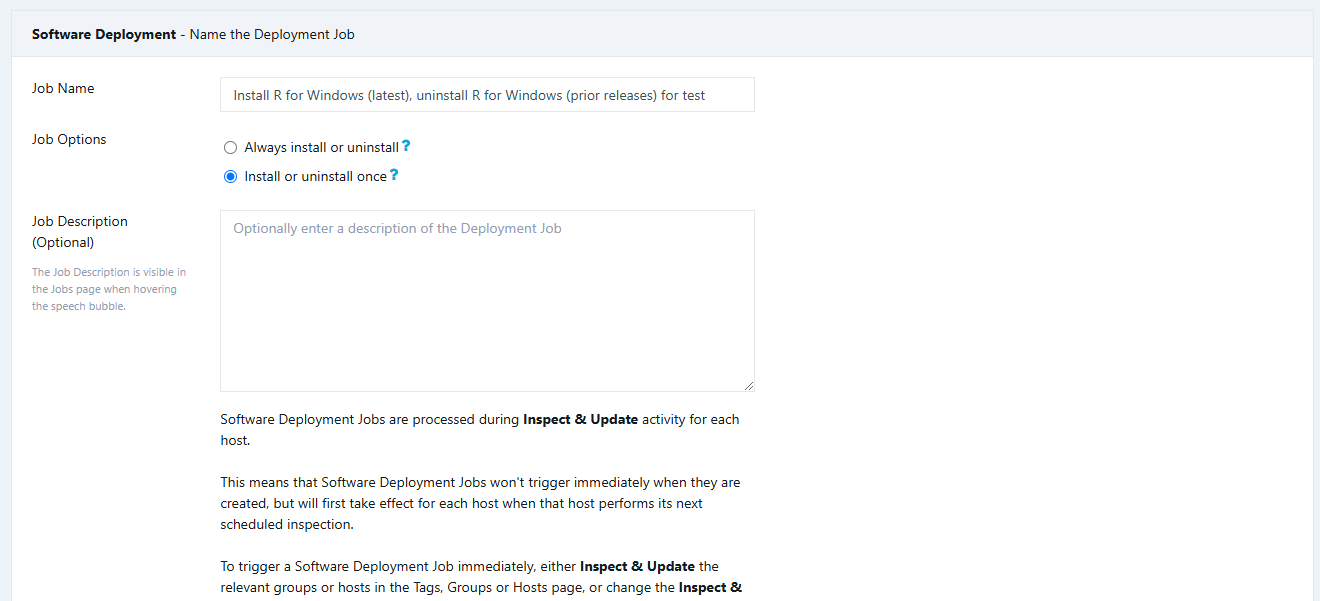
      You can choose to do this on every update by setting the Job Options to "Install or uninstall once" (non-persistent), or use the "Always install or uninstall" which should ensure that it gets updated automatically as long as Tags are assigned correctly.

      90ce7dd3-35db-4050-85ba-8671b589586d-image.png
      daf64dc6-83a9-4670-beaf-552b236f1e03-image.png

      3. Inspect the tagged hosts in order to get immediate results, else the job will apply on the next scheduled inspection.

      On the Tags page, click under the Hosts column to view and inspect the hosts associated with each tag.

      ac1b7134-9664-4921-acae-f812f68b9f52-image.png

      Note: Some hosts might require a second inspection in order to complete the upgrade.

      posted in [Corporate] Deployment -> Custom Software
      rnzR
      rnz
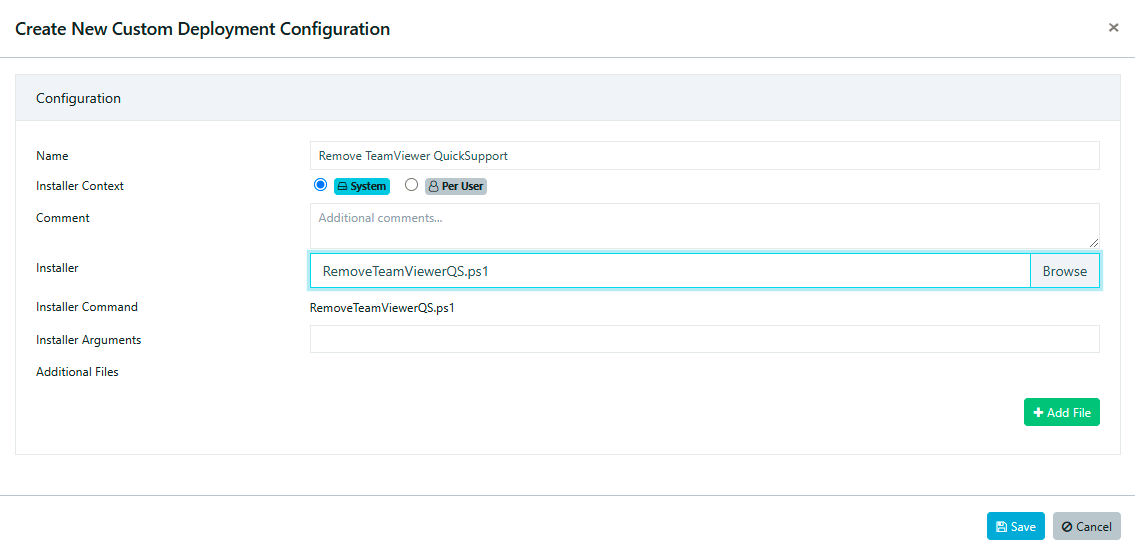
    • TeamViewer QuickSupport removal

      TeamViewer QuickSupport is a portable app that cannot be supported for patching.

      As portable applications do not install, there is no automatic process to delete them, unlike traditional applications that have registry information and provide a silent uninstallString, therefore, portable applications can only be deleted and not uninstalled.

      This script removes TeamViewer QuickSupport.
      It should be noted that deleting files in the SYSTEM context recursively into areas controlled by users is considered bad practice, we have tried to compensate for this by checking if the file is a symbolic link, before removing it.

      # Define the paths to search and the file names to delete
      $rootPath = "C:\"
      $filesToDelete = @("TeamViewerQS.exe", "TeamViewerQS_x64.exe")
      
      # Function to safely delete files without following symlinks
      function Remove-File {
          param (
              [string]$Path,
              [string[]]$Files
          )
          
          # Get all directories and files in the specified path
          $items = Get-ChildItem -Path $Path -Recurse -Force -ErrorAction SilentlyContinue
          
          foreach ($item in $items) {
              # Skip if the item is a symlink
              if ($item.Attributes -band [System.IO.FileAttributes]::ReparsePoint) {
                  Write-Output "Skipping symlink: $($item.FullName)"
                  continue
              }
              
              # Check if the item is one of the files to delete
              if ($Files -contains $item.Name) {
                  try {
                      Remove-Item -Path $item.FullName -Force -ErrorAction Stop
                      Write-Output "Deleted: $($item.FullName)"
                  } catch {
                      Write-Error "Failed to delete: $($item.FullName) - $_"
                  }
              }
          }
      }
      
      # Call the function to remove the files 
      Remove-File -Path $rootPath -Files $filesToDelete
      

      Custom Software Configuration:
      f38d2a2b-ee69-45d4-b2fe-5b8ead22d640-image.png

      posted in [Corporate] Deployment -> Custom Software
      rnzR
      rnz
    • Install AutoCAD LT

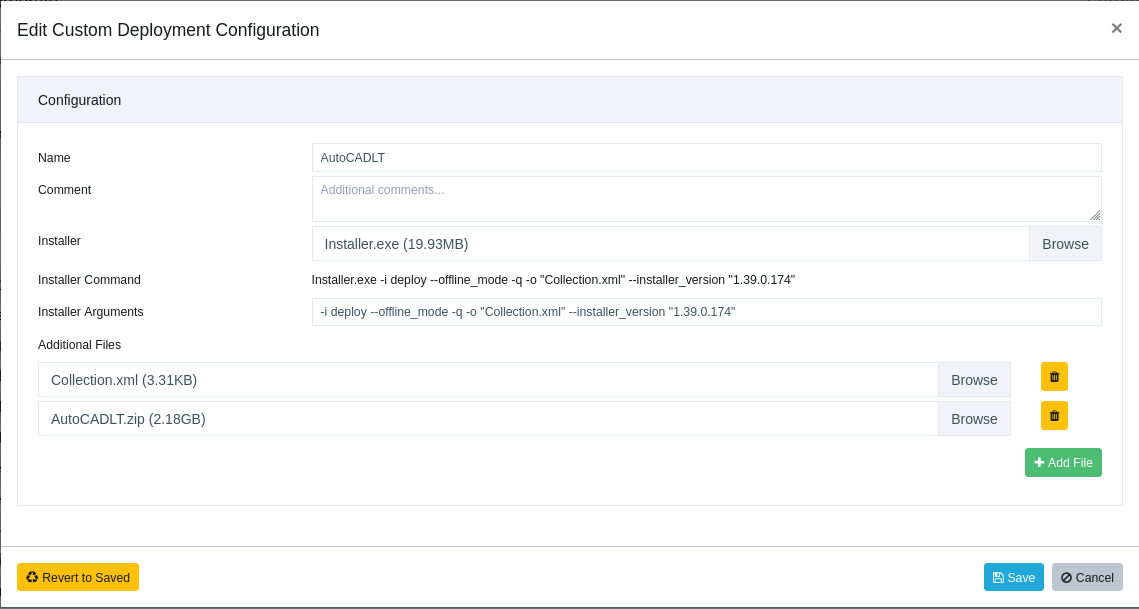
      It is possible to deploy AutoCAD LT with Custom Software.

      The Custom Deployment Configuration should be the following:
      843c6cdd-5923-4b90-991d-4aa99cdbcb9c-image.png

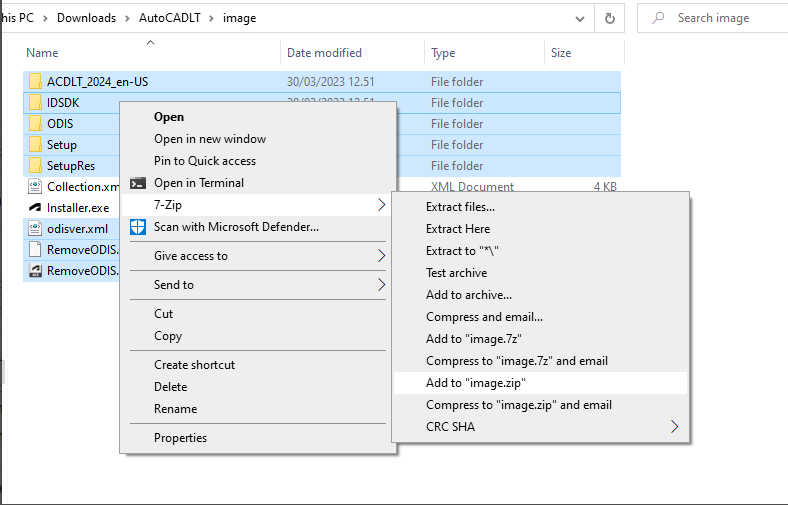
      The AutoCADLT.zip that is seen in the configuration is a modified ZIP. Please see the following screenshot on how to create it:
      1a5e8a51-00fd-40e2-ad66-c59137528040-image.png
      installer.exe and Collection.xml have been left out as this would allow customization without generating a new ZIP file.

      After the task has been completed, we confirm seeing the following installed in the Autodesk folder on the target hosts:
      AdODIS
      AdskIdentitManager
      AutoCAD Activity Insights
      AutoCAD LT 2024
      Genuine Service

      posted in [Corporate] Deployment -> Custom Software
      rnzR
      rnz
    • FortClient VPN - Install, Upgrade

      You may be able to use the Custom Software feature to assist you with FortiClient VPN-only.

      Please be mindful when deploying FortiClient over existing installations as there may be conflicts. To find out more about the upgrade paths check the URL below:
      https://docs.fortinet.com/document/forticlient/7.2.0/upgrade-path

      However, there is a number of different ways in which FortiClient can be configured during distribution, thus we can't predict if the approach you decide upon is compatible with the functionality currently provided in Custom Software.

      We did make Proof-of-Concept deployments of Foxit products using MST files.
      https://vulndetect.org/topic/2382/vulndetect-custom-software-upgrading-foxit-phantompdf-to-foxit-pdf-editor

      The documents for FortiClient suggests that it also supports MST files.

      It also suggests that XML files can be used.

      Please see the full docs here:
      https://docs.fortinet.com/document/forticlient/6.0.0/configurator-tool/343622/forticlient-configurator-tool
      https://docs.fortinet.com/document/forticlient/6.0.0/configurator-tool/754658/deploying-forticlient-windows-installation-packages

      Quote: "Starting with FortiClient 5.6.0, an account for the Fortinet Developer Network is required to access the free tool. No license key is required to use the tool."
      This indicates that you need to login to the Fortinet portal to find the latest tool and possibly documentation, the above links refer to 6.0.0, however, FortiClient is currently at 7.2.x.

      We suggest that you configure FortiClient as required, based on the vendors guidelines, and test it using Custom Software.

      If for some reason it fails using Custom Software, but works with local tests, please provide us access to the files you created, and we will test this and help with adjusting any parameters supplied to the installer through Custom Software.

      Note that the files you share with us most likely will contain some sort of credentials and license information. We will naturally delete any sensitive files after testing and documenting our findings.

      You can find the latest installer here:
      https://www.fortinet.com/support/product-downloads#vpn

      A simple Custom Software configuration should look like this:
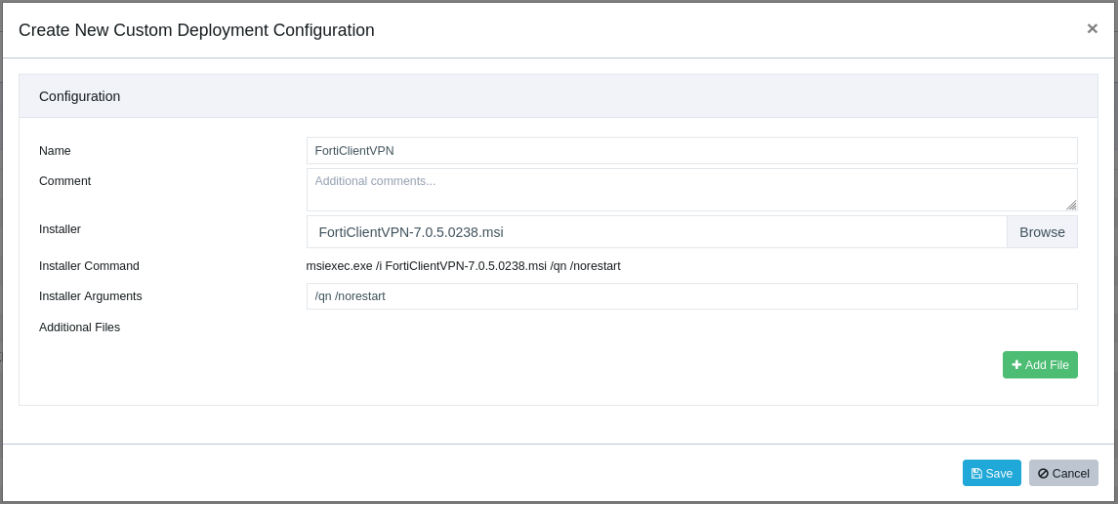
      f62f260a-cc5e-4067-82ae-13b29edda127-image.png

      • Enter a title e.g. "FortiClientVPN"

      • Select the installer: FortiClientVPN-7.0.5.0238.msi

      • Enter the silent Argument: /qn

      • Enter the never restart option Argument: /norestart

      And then click "Save".

      The dialogue will now upload the files to the VulnDetect back-end.

      After saving the Job, you can now select to deploy it to groups or hosts.
      Remember to inspect the host or group, if you want the job to run right away, else it'll apply after the next scheduled inspection.
      posted in [Corporate] Deployment -> Custom Software
      rnzR
      rnz
    • Snagit Uninstaller Tool (manage old annual releases)

      You can use the Snagit Uninstaller Tool with Custom Software in order uninstall specific or all versions of Snagit.
      Please read the official documentation here:
      https://support.techsmith.com/hc/en-us/articles/360022581532-Snagit-Windows-Use-the-UninstallerTool-exe-as-Command-Line-Tool

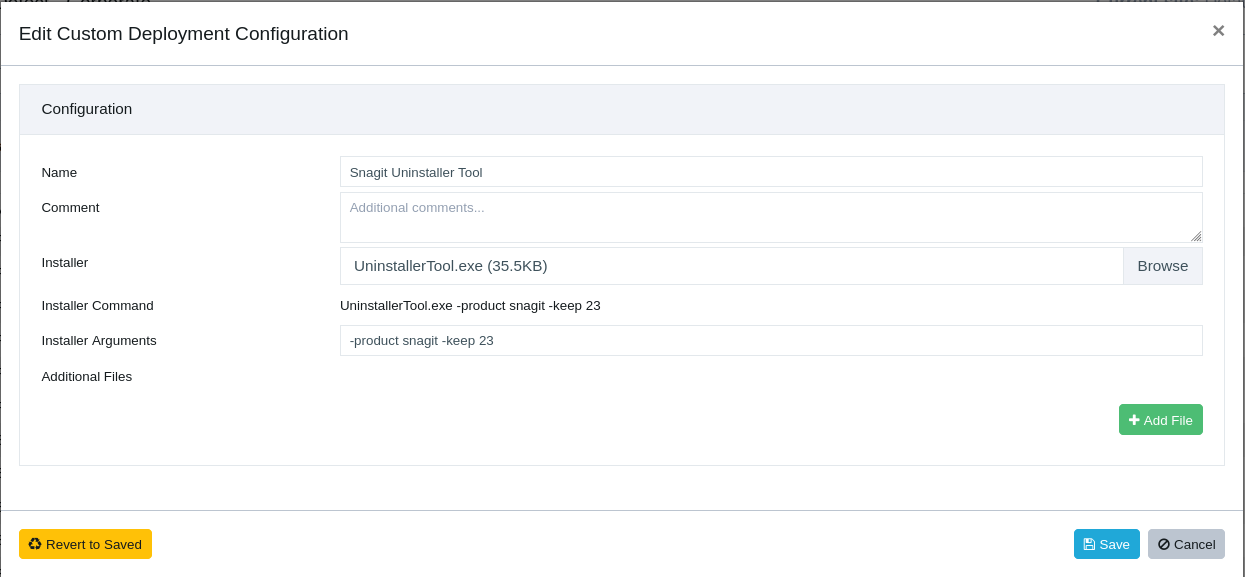
      • Start by creating your new Custom Software here:
        https://corporate.vulndetect.com/#/deployment/custom-create-job
        e74c27fe-1512-4a06-bfba-fd67fc99ff0b-image.png
        The arguments used will keep the 2023 version and uninstall all the previous yearly releases.

      Parameters

      • -product <insert product_name> - Remove all versions of Snagit.
      UninstallerTool.exe -product snagit
      
      • -keep <insert comma-separated version list> - Remove all versions of Snagit except specific versions.
      UninstallerTool.exe -product snagit -keep 23,22
      
      • -remove <insert comma-separated version list> - Remove only specific versions of Snagit.
      UninstallerTool.exe -product snagit -remove 20,21
      
      posted in [Corporate] Deployment -> Custom Software
      rnzR
      rnz
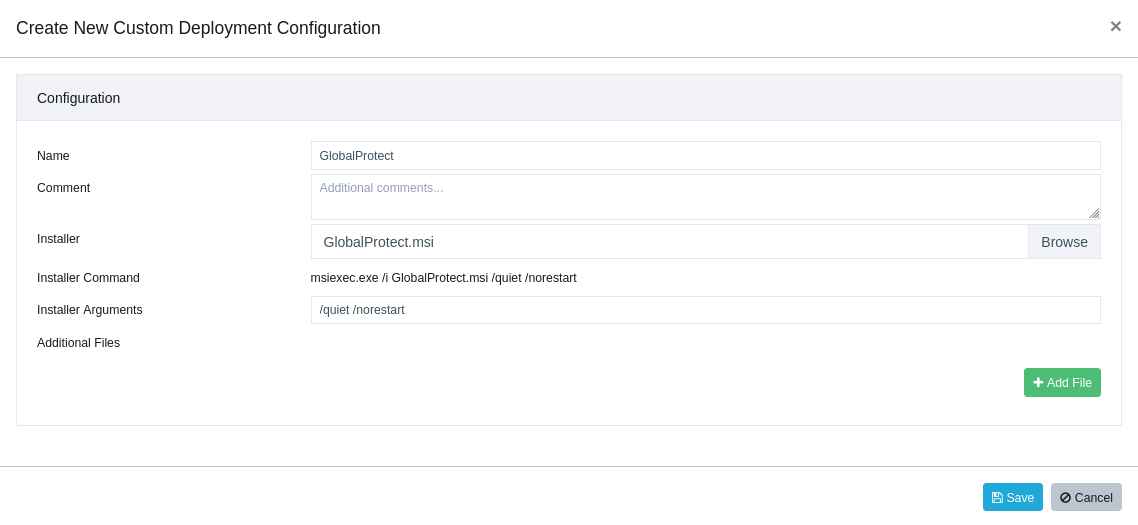
    • Palo Alto Networks GlobalProtect - Install, Upgrade

      The installer(s) of GlobalProtect are not publicly available for download. You will need to acquire them through the GlobalProtect portal as stated in the official documentation from the vendor's website.

      You can read the full article here:
      https://docs.paloaltonetworks.com/globalprotect/6-1/globalprotect-app-user-guide/globalprotect-app-for-windows/download-and-install-the-globalprotect-app-for-windows

      Once you have acquired the installer, you can upload it to VulnDetect using the Custom Software feature, use the documented silent parameters and run the inspection on the Hosts you have deployed the Custom Software job.

      dde41921-6b5d-4b45-9a2b-fa8473de8ba9-image.png

      Additionally, the installer can be configured with the following arguments:

      • configure the portal address
      /quiet /norestart PORTAL=”portal.acme.com”
      
      • prevent users from connecting to the portal if the certificate is not valid
      /quiet /norestart CANCONTINUEIFPORTALCERTINVALID=”no”
      
      posted in [Corporate] Deployment -> Custom Software
      rnzR
      rnz
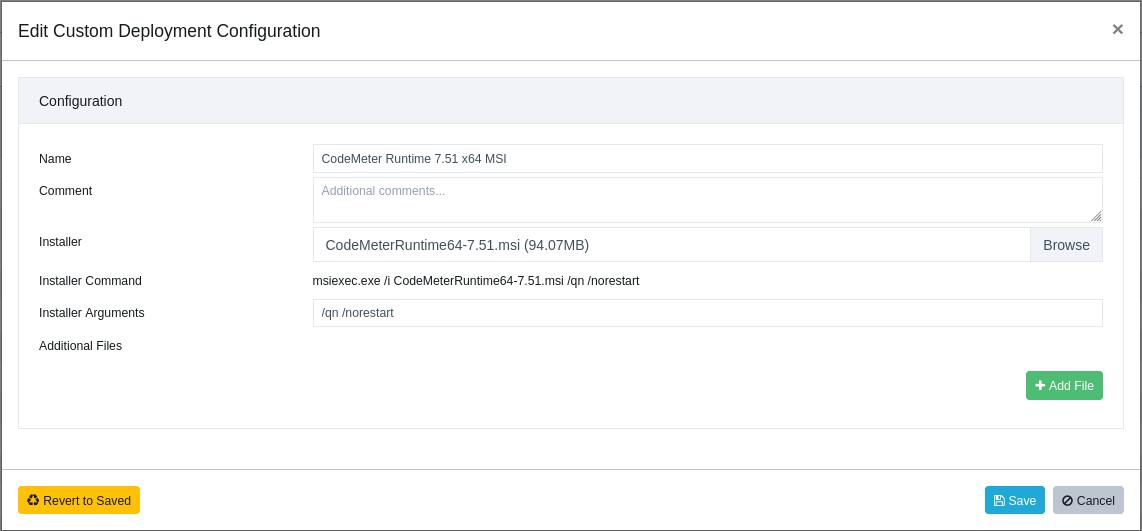
    • CodeMeter Runtime - Install, Upgrade

      CodeMeter Runtime can be deployed/updated using the Custom Software feature in VulnDetect - Corporate:

      You can download official installers from here:
      https://www.wibu.com/us/support/developer/downloads-developer-software.html
      We have used the CodeMeter Runtime Kit for Distribution x64 MSI installer for our tests.
      89fae09c-1bf5-443b-94c2-49a6d3cd3af5-image.png
      Upload the MSI and insert the following silent arguments: /qn /norestart
      3891412e-3779-45d0-9dec-28f55e3f5739-image.png
      You are now ready to deploy or upgrade CodeMeter Runtime.

      posted in [Corporate] Deployment -> Custom Software
      rnzR
      rnz
    • OpenVPN - Install, Upgrade

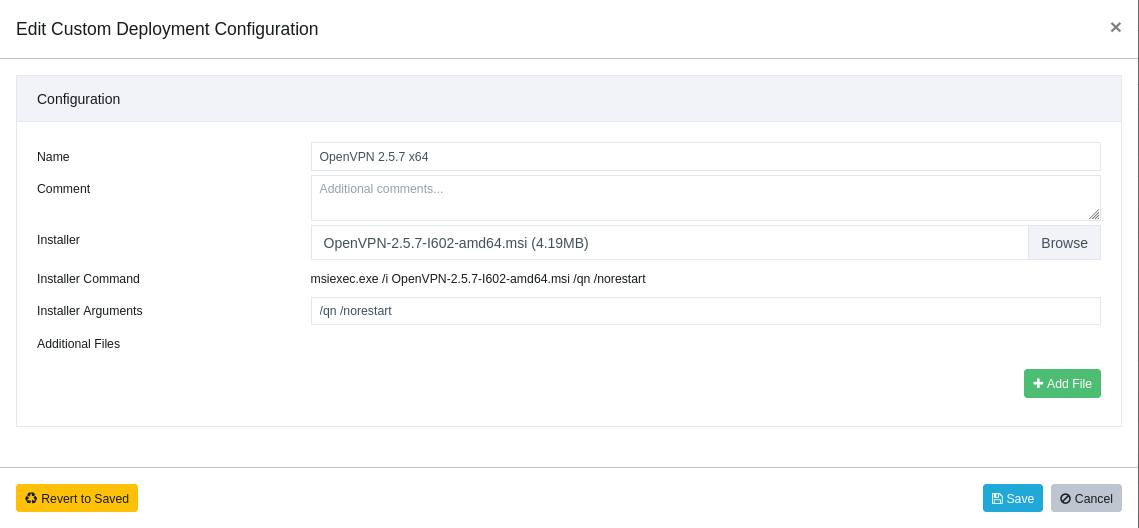
      OpenVPN can be deployed/updated using the Custom Software feature in VulnDetect - Corporate:

      Note: Updating has worked on our internal systems without an active VPN configuration. We expect that the update will kill active VPN connections.

      You can download official installers from here:
      https://openvpn.net/community-downloads/

      Upload the installer and insert the following silent arguments: /qn /norestart
      11dc8056-35a5-4beb-ae73-d528008ae37a-image.png
      You are now ready to deploy or upgrade OpenVPN.

      posted in [Corporate] Deployment -> Custom Software
      rnzR
      rnz
    • AnyConnect - Install, Upgrade

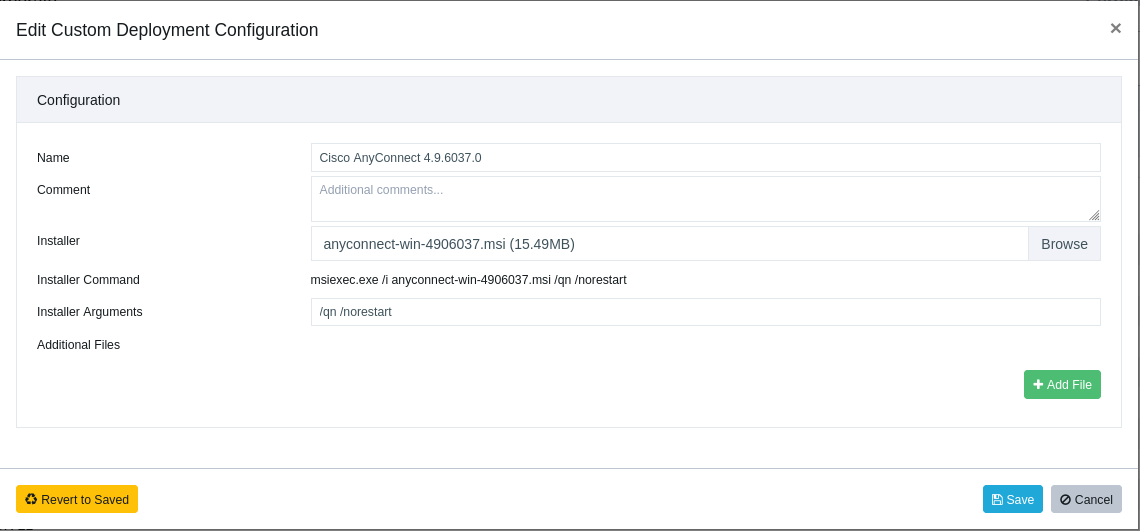
      AnyConnect can be deployed/updated using the Custom Software feature in VulnDetect - Corporate:

      Note: Updating has worked on our internal systems without an active VPN configuration. We expect that the update will kill active VPN connections.

      You can download official installers from here:
      https://www.cisco.com/c/en/us/support/security/anyconnect-secure-mobility-client-v4-x/model.html#~tab-downloads

      Upload the installer and insert the following silent arguments: /qn /norestart
      9f59a526-1f4f-4b91-a139-560f45a0e322-image.png
      You are now ready to deploy or upgrade AnyConnect.

      posted in [Corporate] Deployment -> Custom Software
      rnzR
      rnz
    • WorkPoint Express - Install

      (Updating should also work, but we can't test this, as we don't have a license for the software)

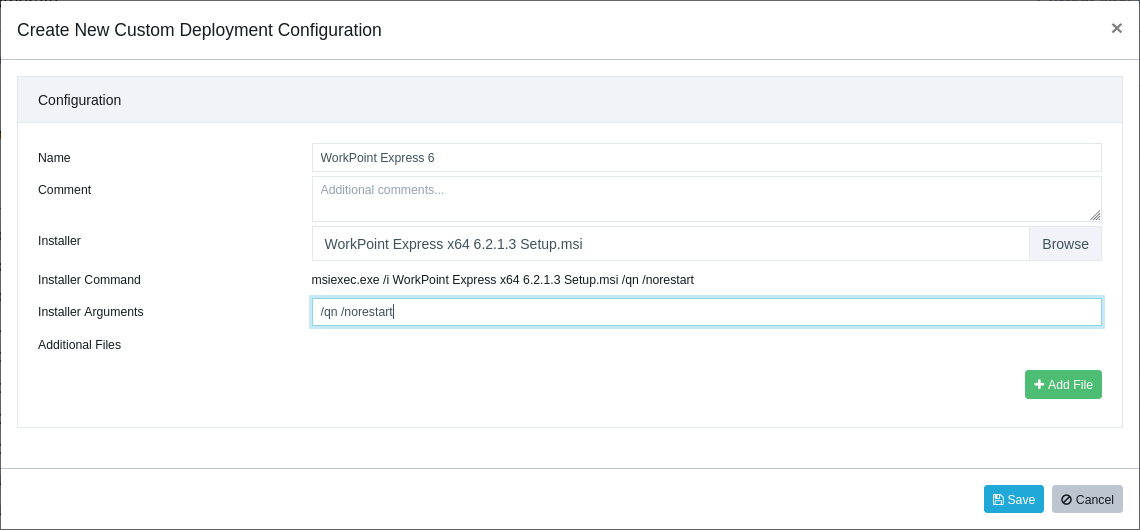
      In order to create a custom deployment for WorkPoint Express, please navigate to:
      https://corporate.vulndetect.com/#/deployment/custom-create-job

      • Enter a title e.g. "WorkPoint Express 6"
      • Select the installer: WorkPoint Express x64 6.2.1.3 Setup.msi
      • Enter the silent Argument: /qn
      • Enter the never restart option Argument: /norestart

      For more information about relevant (and required arguments) see:
      https://support.workpoint.dk/hc/en-us/articles/10725311536274-Central-deployment-of-WorkPoint-Express

      3af71e07-5abe-4c7e-9673-bad32a5768cf-image.png
      And then click "Save".
      The dialogue will now upload the files to the VulnDetect back-end.

      After saving the Job, you can now select to deploy it to groups or hosts.
      Remember to inspect the host or group, if you want the job to run right away, else it'll apply after the next scheduled
      inspection.
      After the Job is "Completed" on a host, VulnDetect will automatically conduct a new inspection and update the results for
      each host:
      https://corporate.vulndetect.com/#/deployment/activity
      And you should be able to find the updated results on the hosts or applications page moments later.
      098dd201-6b9a-40e6-ad24-baf59e81019d-image.png

      posted in [Corporate] Deployment -> Custom Software
      rnzR
      rnz
    • SeaMonkey - Install, Upgrade

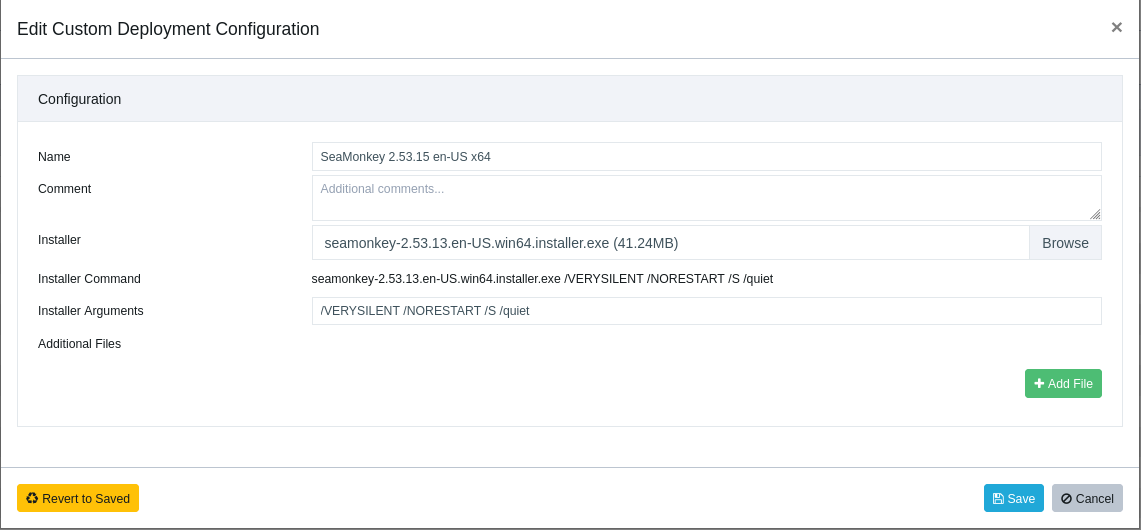
      SeaMonkey can be upgraded using the Custom Software feature in VulnDetect - Corporate:

      Note: Upgrading will require the same language installer to be applied to the existing installation in order for the process to be silent.

      You can download official installers from here:
      https://www.seamonkey-project.org/releases/
      Make sure to select the right architecture: Windows x64/Windows x86

      Upload the installer and insert the following silent arguments: /VERYSILENT /NORESTART /S /quiet
      56907691-ca8e-42d5-b697-e870bfbd5a8b-image.png
      After uploading the file, you need to select the groups or hosts to which you wish to deploy the package / updates.

      posted in [Corporate] Deployment -> Custom Software
      rnzR
      rnz
    • TightVNC - Install, Upgrade

      TightVNC can be upgraded using the Custom Software feature in VulnDetect - Corporate:
      https://corporate.vulndetect.com/#/deployment/custom-create-job

      Download the latest installers from the official website:
      https://www.tightvnc.com/download.html

      The parameters used in this guide are present in TightVNC's official documentation:
      https://www.tightvnc.com/doc/win/TightVNC_2.7_for_Windows_Installing_from_MSI_Packages.pdf

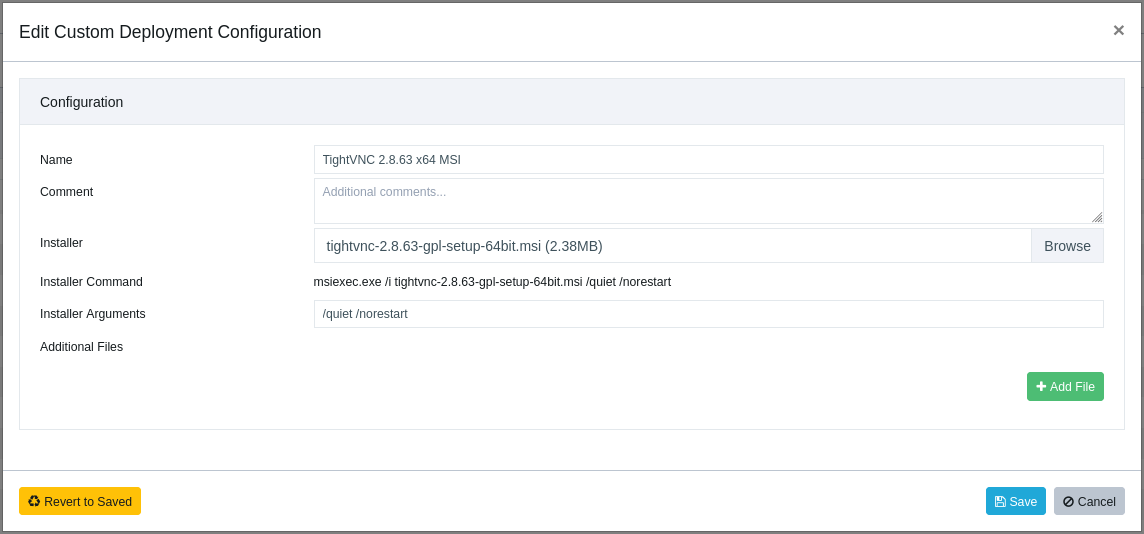
      To install TightVNC with its default settings use /quiet /norestart, this will install (or upgrade) both Viewer and Server.
      9c9b8115-b03a-4ae3-8c78-38211ef24a76-image.png

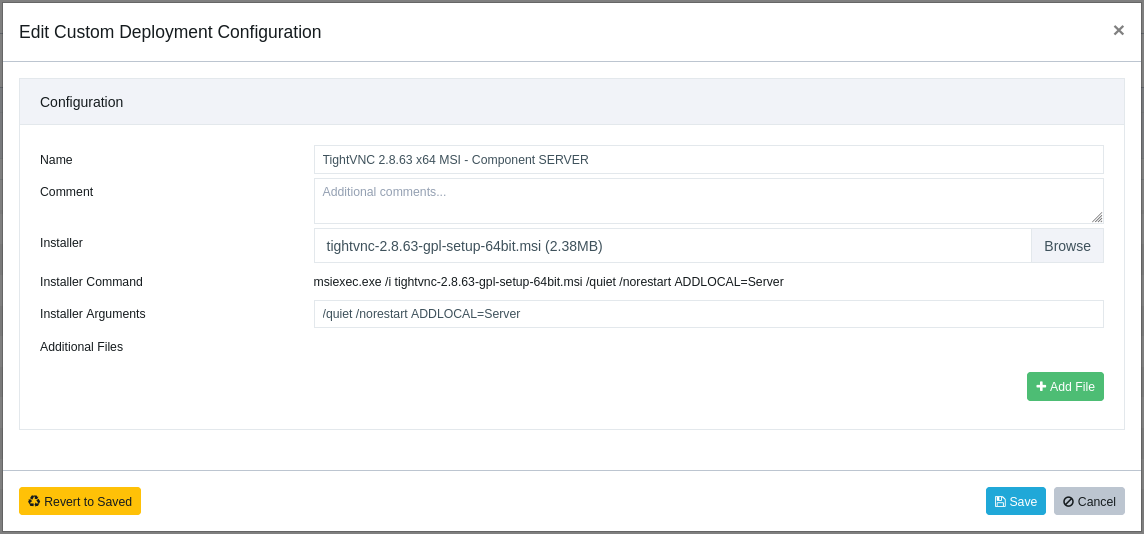
      If you would like to install a specific component of TightVNC, use the standard MSI property
      named ADDLOCAL. The following three commands install only the server part, only the client part
      and both parts, correspondingly:

      • msiexec /i tightvnc-2.8.63-gpl-setup-64bit.msi /quiet /norestart ADDLOCAL=Server
      • msiexec /i tightvnc-2.8.63-gpl-setup-64bit.msi /quiet /norestart ADDLOCAL=Viewer
      • msiexec /i tightvnc-2.8.63-gpl-setup-64bit.msi /quiet /norestart ADDLOCAL="Server,Viewer"
      

      Note that running the installer with e.g., ADDLOCAL=Server, on a system with both Viewer and Server, will remove the Viewer.

      a3d8960c-84c0-4125-96f8-a009be5ba7e1-image.png
      TightVNC with the Server component only.

      aebcbe91-167a-4de8-8440-6b0608266cfe-image.png

      posted in [Corporate] Deployment -> Custom Software
      rnzR
      rnz
    • Cisco Jabber - Install, Upgrade

      This guide is meant as a supplement to cover the channels of Cisco Jabber where the installer isn't publicly available, but still are supported.

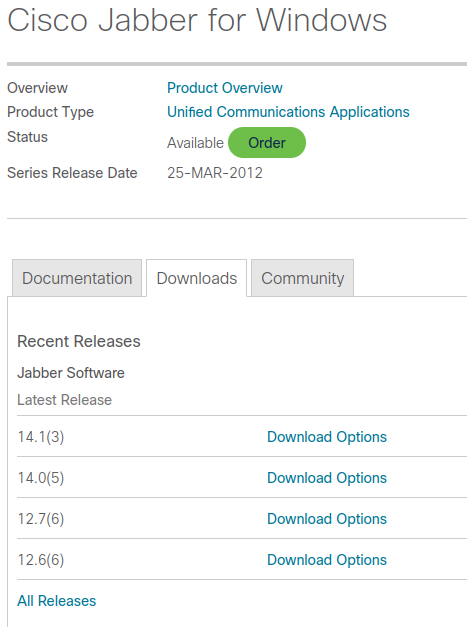
      Jabber installers starting with 14.0.5 and 14.1.2 are no longer made public by Cisco. Customers with an active contract from Cisco are able to acquire any installer from the following page:

      https://www.cisco.com/c/en/us/support/unified-communications/jabber-windows/series.html#~tab-downloads

      0c57a7ce-4ea5-40db-9c94-0c8bf78d0621-image.png

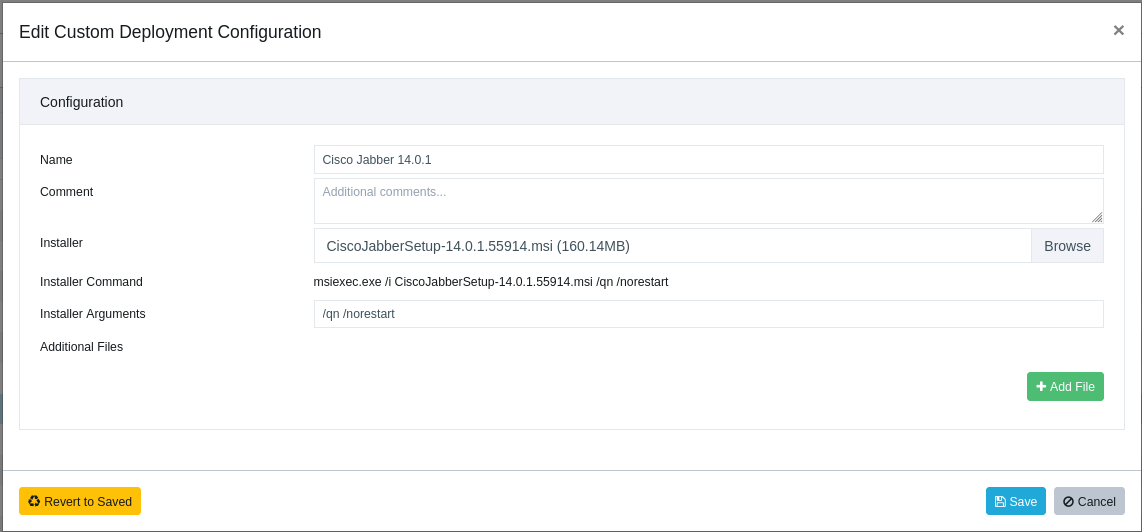
      Once the installer is downloaded you just need to upload it and add the usual /qn /norestart parameters to make the MSI silent.
      6dd69387-2cb9-4b52-8c69-7c1146e817a4-image.png

      You are now ready to deploy or upgrade Cisco Jabber.

      posted in [Corporate] Deployment -> Custom Software
      rnzR
      rnz
    • Zoom - Uninstall with the Clean Zoom Uninstaller

      Zoom has published a tool to help tidying unwanted Zoom installations.

      You can download the Zoom Uninstaller from here:
      https://stream.vulndetect.com/e/CleanZoom.exe

      The following switches are available when running the installer:

      MSI option | Description

      • /silent - Removes Zoom silently.
      • /keep_outlook_plugin - Removes Zoom, but leaves the Outlook Plugin installed.
      • /keep_lync_plugin - Removes Zoom, but leaves the Lync/Skype for Business Plugin installed.
      • /keep_notes_plugin - Removes Zoom, but leaves the Notes Plugin installed.
      • /vdi_clean - Removes the VDI package.

      Note: Use of the clean uninstaller will completely remove the Zoom client, as well as the Zoom plugin for Outlook. The Outlook add-in, Chrome/Firefox extensions, and the GSuite add-on are unaffected.

      • Enter a title e.g. "Zoom Uninstall"

      • Select the uninstall executable: CleanZoom.exe

      • Enter the silent Argument: /silent

      Optionally configure the uninstall using the parameters mentioned above:

      • Enter Installer Arguments: /silent /keep_outlook_plugin"

      And then click "Save".

      487464e2-bb15-480f-a543-4663009313f1-image.png
      The dialogue will now upload the files to the VulnDetect backend.

      After saving the Job, you can now select to deploy it to groups or hosts.

      Remember to inspect the host or group, if you want the job to run right away, else it'll apply after the next scheduled inspection.
      After the Job is "Completed" on a host, VulnDetect will automatically conduct a new inspection and update the results for each host:
      https://corporate.vulndetect.com/#/deployment/activity

      And you should be able to find the updated results on the hosts or applications page moments later.
      b1c23582-a87b-4651-b9bc-5befe64e478b-image.png

      posted in [Corporate] Deployment -> Custom Software
      rnzR
      rnz